

tensorflow入门教程(四十三)人体姿态检测(一)
发布于2019-08-07 11:56 阅读(4509) 评论(3) 点赞(4) 收藏(1)
#
#作者:韦访
#博客:https://blog.csdn.net/rookie_wei
#微信:1007895847
#添加微信的备注一下是CSDN的
#欢迎大家一起学习
#
------韦访 20190525
1、概述
这次我们先不讲原理,先在Github上拿个源码来跑,有感觉以后,再去分析它的工作原理和源码,所以这一讲我们先来个初探人体姿态检测。先来说说什么是人体姿态检测吧,

如上图所示,简单的说,就是检测出人体的双眼,鼻子,耳朵,双肩,双臂,臀部,膝盖等等关键点,然后再将这个关键点有序的连接起来,形成人的“骨架”。
2、源码下载
Github源码地址为:https://github.com/ildoonet/tf-pose-estimation
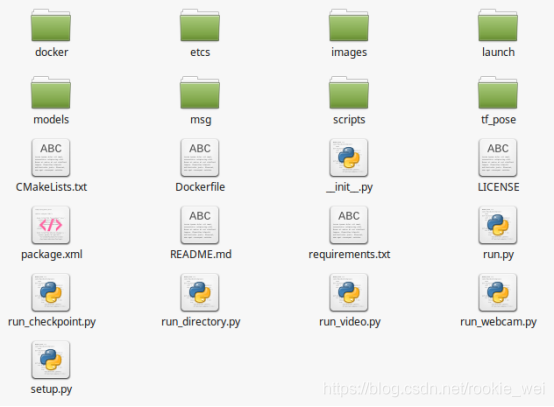
先把源码下载下来,下载完后,源码的大概结构如下图所示,
3、安装
一般看这种开源项目,先看看它的README文档说些什么,如果里面有安装使用说明,按照它的要求做就好了,来看这个项目的文档,
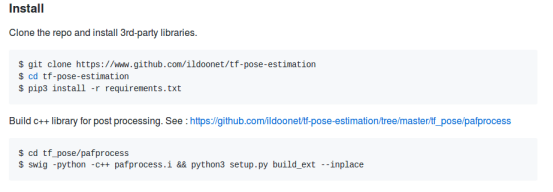
跟着做就好了,假设我们源码已经下载好了,cd到源码根目录了,然后执行,
sudo pip3 install -r requirements.txt
上面的命令就是通过pip安装一些需要的Python第三方库,
如果pycocotools库安装失败,则执行下面的命令安装,
sudo pip3 install git+https://github.com/philferriere/cocoapi.git#subdirectory=PythonAPI
接着,
cd tf_pose/pafprocess
swig -python -c++ pafprocess.i && python3 setup.py build_ext --inplace
然后去下载cmu模型的pb文件,
cd models/graph/cmu
bash download.sh
最后,电脑插上摄像头,在项目的根目录执行,
python run_webcam.py --model=mobilenet_thin --resize=432x368 --camera=0
运行结果如下,
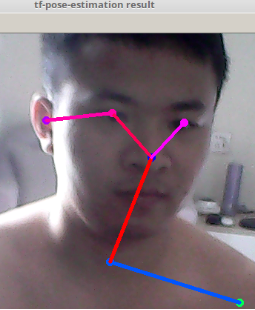
我这渣渣摄像头总算又派上用场了~
4、run_webcam.py源码
我们来看一下run_webcam.py的源码,先找到main函数,
if __name__ == '__main__':
    parser = argparse.ArgumentParser(description='tf-pose-estimation realtime webcam')
    parser.add_argument('--camera', type=int, default=0)

    parser.add_argument('--resize', type=str, default='0x0',
                        help='if provided, resize images before they are processed. default=0x0, Recommends : 432x368 or 656x368 or 1312x736 ')
    parser.add_argument('--resize-out-ratio', type=float, default=4.0,
                        help='if provided, resize heatmaps before they are post-processed. default=1.0')

    parser.add_argument('--model', type=str, default='mobilenet_thin', help='cmu / mobilenet_thin / mobilenet_v2_large / mobilenet_v2_small')
    parser.add_argument('--show-process', type=bool, default=False,
                        help='for debug purpose, if enabled, speed for inference is dropped.')
    args = parser.parse_args()
如上代码所示,一堆参数,我们大概看一下,camera参数,指定哪个摄像头,如果你是土豪的话,电脑有很多个摄像头,就可以指定使用哪个摄像头,只有一个的话就是0,resize参数,应该是调整要输出的图像的大小,resize-out-ratio参数,看它的help,resize heatmaps,我们先假装不知道这个heatmaps是什么东西,用它默认值就好了,model参数,这里有4个选项,应该是指定哪个模型,我们刚才不是下载了一个cmu的模型吗?这里就可以指定用cmu模型了,从命名可以看出,有三个模型都是以mobile命名的,应该是针对手机或者嵌入式设备的网络,那么就会比较在意资源的使用,可能就会对精度有点牺牲,所以我感觉我们用GPU来跑的话,用这个cmu模型效果应该会更好。
接着往下看,
logger.debug('initialization %s : %s' % (args.model, get_graph_path(args.model)))
w, h = model_wh(args.resize)
if w > 0 and h > 0:
    e = TfPoseEstimator(get_graph_path(args.model), target_size=(w, h))
else:
    e = TfPoseEstimator(get_graph_path(args.model), target_size=(432, 368))
TfPoseEstimator是个类,这里先实例化这个类,具体这个类干嘛的,我们先不管,继续往下看,
logger.debug('cam read+')
cam = cv2.VideoCapture(args.camera)
ret_val, image = cam.read()
logger.info('cam image=%dx%d' % (image.shape[1], image.shape[0]))

while True:
    ret_val, image = cam.read()

    logger.debug('image process+')
    humans = e.inference(image, resize_to_default=(w > 0 and h > 0), upsample_size=args.resize_out_ratio)

    logger.debug('postprocess+')
    image = TfPoseEstimator.draw_humans(image, humans, imgcopy=False)

    logger.debug('show+')
    cv2.putText(image,
                "FPS: %f" % (1.0 / (time.time() - fps_time)),
                (10, 10),  cv2.FONT_HERSHEY_SIMPLEX, 0.5,
                (0, 255, 0), 2)
    cv2.imshow('tf-pose-estimation result', image)
    fps_time = time.time()
    if cv2.waitKey(1) == 27:
        break
    logger.debug('finished+')

cv2.destroyAllWindows()
上面的代码就是先用opencv从摄像头中读取一帧一帧的图像数据,然后将图像数据传给TfPoseEstimator类的inference函数,得到一个返回值humans,humans和图像数据image再传给TfPoseEstimator类的draw_humans函数,得到的返回值通过opencv显示出来,就是我们看到的人体姿态检测图。可以猜一下,这个humans应该包含了人体的关键点信息,之所以是humans而不是human,应该是这个信息有可以同时包含多个人的,而draw_humans函数的功能则是根据这些信息和原始图像数据image,将这些关键点和其连接画到原始图像上。
5、draw_humans函数
为了验证上面的猜想是否正确,我们来看看draw_humans函数做了什么,先贴代码,
@staticmethod
def draw_humans(npimg, humans, imgcopy=False):
    if imgcopy:
        npimg = np.copy(npimg)
    # 获取图片的高和宽
    image_h, image_w = npimg.shape[:2]

    centers = {}
    # humans可能包含多个人的信息
    for human in humans:
        # draw point
        for i in range(common.CocoPart.Background.value):

            if i not in human.body_parts.keys():
                continue

            # 取出对应的关键点
            body_part = human.body_parts[i]
            # 计算关键点坐标,body_part中的值只是关键点相对图片的位置的比例,并不是真实的坐标值
            # 加0.5应该是为了做四舍五入运算,因为图片中的坐标值一定得是整数的
            center = (int(body_part.x * image_w + 0.5), int(body_part.y * image_h + 0.5))

            centers[i] = center
            # 用一个小圆点画出关键点
            cv2.circle(npimg, center, 3, common.CocoColors[i], thickness=3, lineType=8, shift=0)

        # draw line
        for pair_order, pair in enumerate(common.CocoPairsRender):
            # 关节两端的关键点同时检测到,才画直线
            if pair[0] not in human.body_parts.keys() or pair[1] not in human.body_parts.keys():
                continue

            # npimg = cv2.line(npimg, centers[pair[0]], centers[pair[1]], common.CocoColors[pair_order], 3)
            # 用直线将关节画出来
            cv2.line(npimg, centers[pair[0]], centers[pair[1]], common.CocoColors[pair_order], 3)

    return npimg
上面代码中的common.CocoPart类就包含了我们要检测的关键点,
class CocoPart(Enum):
    Nose = 0
    Neck = 1
    RShoulder = 2
    RElbow = 3
    RWrist = 4
    LShoulder = 5
    LElbow = 6
    LWrist = 7
    RHip = 8
    RKnee = 9
    RAnkle = 10
    LHip = 11
    LKnee = 12
    LAnkle = 13
    REye = 14
    LEye = 15
    REar = 16
    LEar = 17
    Background = 18
而CocoPairsRender数组包含的是由对应关键点组成的关节的元祖,
CocoPairs = [
    (1, 2), (1, 5), (2, 3), (3, 4), (5, 6), (6, 7), (1, 8), (8, 9), (9, 10), (1, 11),
    (11, 12), (12, 13), (1, 0), (0, 14), (14, 16), (0, 15), (15, 17), (2, 16), (5, 17)
]   # = 19
CocoPairsRender = CocoPairs[:-2]
为了方便理解,我用我魔性的绘画水准画出了下面的示意图,
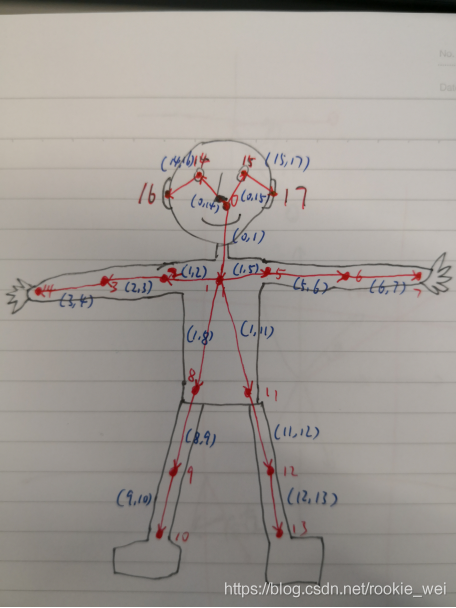
为什么上图没有头发呢?因为程序员不需要头发的~
大家对比一下上面这张图就很好理解common.CocoPart类和CocoPairsRender数组了。为了方便后续查看,我给上面的CocoPairs加了注释,
CocoPairs = [
    (1, 2), # 右肩,
    (1, 5), # 左肩,
    (2, 3), # 右肘,
    (3, 4), # 右腕
    (5, 6), # 左肘
    (6, 7), # 左腕
    (1, 8), # 右臀
    (8, 9), # 右膝盖
    (9, 10), # 右脚踝
    (1, 11), # 左臀
    (11, 12), # 左膝盖
    (12, 13), # 左脚踝
    (1, 0), # 鼻子
    (0, 14), # 右眼
    (14, 16), # 右耳
    (0, 15), # 左眼
    (15, 17), # 左耳
    (2, 16),
    (5, 17)
]   # = 19
CocoPairsRender = CocoPairs[:-2]
其他的都比较好理解,直接看注释好了,后续的博客,我们先看原始论文的算法,再解析源码,这一讲就先到这里了。
如果您感觉本篇博客对您有帮助,请打开支付宝,领个红包支持一下,祝您扫到99元,谢谢~~

所属网站分类: 技术文章 > 博客
作者:大哥别打我
链接:https://www.pythonheidong.com/blog/article/10529/df244878daf35e3bf18e/
来源:python黑洞网
任何形式的转载都请注明出处,如有侵权 一经发现 必将追究其法律责任
昵称:
评论内容:(最多支持255个字符)
---无人问津也好,技不如人也罢,你都要试着安静下来,去做自己该做的事,而不是让内心的烦躁、焦虑,坏掉你本来就不多的热情和定力