

keras—VGG19(一)
发布于2019-09-11 15:13 阅读(1813) 评论(0) 点赞(18) 收藏(0)
数据和模型 https://blog.csdn.net/u010986753/article/details/98526886
一、 VGG介绍
1.1 VGG19 结构图
'''
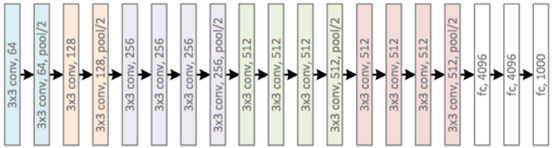
每一个块内包含若干卷积层和一个池化层。并且同一块内,卷积层的通道(channel)数是相同的,
block1中包含2个卷积层,每个卷积层用conv3-64表示,即卷积核为:3×3,通道数都是64,卷积核有64个,
共有[输入通道3×卷积核(3 × 3)]× 卷积和通道64 = 1728个参数。
共有[输入通道64×卷积核(3 × 3)]× 卷积和通道64 = 36864个参数。
输入224×224×3,2卷积后224×224×64,池化输出:112×112×64
block2中包含2个卷积层,每个卷积层用conv3-128表示,即卷积核为:3×3,通道数都是128,
共有[输入通道64×卷积核(3 × 3)]× 卷积和通道128 = 73728个参数。
共有[输入通道128×卷积核(3 × 3)]× 卷积和通道128 = 147456个参数。
输入112×112×64,2卷积后112×112×128,池化输出:56×56×128
block3中包含4个卷积层,每个卷积层用conv3-256表示,即卷积核为:3×3,通道数都是256,
共有[输入通道128×卷积核(3 × 3)]× 卷积和通道256 = 294912个参数。
共有[输入通道256×卷积核(3 × 3)]× 卷积和通道256 = 589824个参数。
共有[输入通道256×卷积核(3 × 3)]× 卷积和通道256 = 589824个参数。
共有[输入通道256×卷积核(3 × 3)]× 卷积和通道256 = 589824个参数。
输入56×56×128,3卷积后56×56×256,池化输出:28×28×256
Block4中包含4个卷积层,每个卷积层用conv3-512表示,即卷积核为:3×3,通道数都是512,
共有[输入通道256×卷积核(3 × 3)]× 卷积和通道512 = 1179648个参数。
共有[输入通道512×卷积核(3 × 3)]× 卷积和通道512 = 2359296个参数。
共有[输入通道512×卷积核(3 × 3)]× 卷积和通道512 = 2359296个参数。
共有[输入通道512×卷积核(3 × 3)]× 卷积和通道512 = 2359296个参数。
输入28×28×256,3卷积后28×28×512,池化输出:14×14×512
block5中包含4个卷积层,每个卷积层用conv3-512表示,即卷积核为:3×3,通道数都是512,
共有[输入通道512×卷积核(3 × 3)]× 卷积和通道512 = 2359296个参数。
共有[输入通道512×卷积核(3 × 3)]× 卷积和通道512 = 2359296个参数。
共有[输入通道512×卷积核(3 × 3)]× 卷积和通道512 = 2359296个参数。
共有[输入通道512×卷积核(3 × 3)]× 卷积和通道512 = 2359296个参数。
输入14×14×512,3卷积后14×14×512,池化输出:7×7×512
'''
'''权重参数:所包含的权重数目很大,达到了惊人的138 357 544 个参数
全连接层的权重参数数目的方法为:前一层节点数×本层的节点数。
FC(1×1×4096)参数:7×7×512×4096=102760448,memory4096
FC(1×1×4096)参数:4096×4096=16777216,memory4096
FC(1×1×1000)参数:4096×1000=4096000,memory1000
'''
- 1
- 2
- 3
- 4
- 5
- 6
- 7
- 8
- 9
- 10
- 11
- 12
- 13
- 14
- 15
- 16
- 17
- 18
- 19
- 20
- 21
- 22
- 23
- 24
- 25
- 26
- 27
- 28
- 29
- 30
- 31
- 32
- 33
- 34
- 35
- 36
- 37
- 38
1.2 VGG16 和 VGG19 对比

二、 VGG-19 参数文件解析
2.1 分析模型文件
总共有很多参数,我们只关心我们需要关注的,W和B在哪里就行了,注意这里还有一个mean(平均值),因为VGG使用了图像预处理方式是 input - mean,当然这种处理方式在现在看来不怎么好,但是现在我们用人家的模型,需要遵照人家的意思.
- 从下面的图看到存储的43个参数
- 注意里面的Relu是没有数据的,因为Relu就是一个函数
- 注意Pool的参数是固定的,因为大小为:[1,2,2,1],步长[1,2,2,1],这里可以自己写,也可以读取参数
- Weight Bias是存放在Relu Pool 中间的,而且两个值存在一起的.
- mean值查看 vgg[“normalization”][0][0][0][0][0]
- layers查看 data[‘layers’][0][i][0][0][0][0])
2.2 imagenet-vgg-verydeep-19
imagenet-vgg-verydeep-19.mat 文件有500多兆。注意19只包含了卷积层,没有算池化、Relu和最后的FC-1000,而在下载的模型参数中这些层都有包含。

from scipy.io import loadmat
import os
import numpy as np
import scipy.misc

vgg = loadmat('CNN/keras/VGG19_h5/imagenet-vgg-verydeep-19.mat')
print('type(vgg)',type(vgg))
#先显示一下数据类型,发现是dict,type(vgg) <class 'dict'>
print('vgg.keys()',vgg.keys())
# vgg.keys() dict_keys(['__header__', '__version__', '__globals__', 'layers', 'classes', 'normalization'])

# 进入layers字段,我们要的权重和偏置参数应该就在这个字段下
layers = vgg['layers']

# 打印下layers发现输出一大堆括号,好复杂的样子:[[ array([[ (array([[ array([[[[ ,顶级array有两个[[
# 所以顶层是两维,每一个维数的元素是array,array内部还有维数
print(layers,type(layers))
#输出一下大小,发现是(1, 43),存储的43个参数,说明虽然有两维,但是第一维是”虚的”,也就是只有一个元素
#根据模型可以知道,这43个元素其实就是对应模型的43层信息(conv1_1,relu,conv1_2…),Vgg-19没有包含Relu和Pool,那么看一层就足以,
#而且我们现在得到了一个有用的index,那就是layer,layers[layer]
print("layers.shape:",layers.shape)#layers.shape: (1, 43)
layer = layers[0]
print('layer',layer)
print("layer.shape:",layer.shape,type(layer))#layer.shape: (43,)
#输出的尾部有dtype=[('weights', 'O'), ('pad', 'O'), ('type', 'O'), ('name', 'O'), ('stride', 'O')])
#可以看出顶层的array有5个元素,分别是weight(含有bias), pad(填充元素,无用), type, name, stride信息,
#然后继续看一下shape信息
print("layer[0][0].shape:",layer[0][0].shape)#layer[0][0].shape: (1,)说明只有一个元素
print("layer[0][0][0].shape:",layer[0][0][0].shape)
#layer[0][0][0].shape: ()

print("len(layer[0][0][0]):",len(layer[0][0][0]))#len(layer[0][0][0]): 5
print(layer[0][0][0])
print(layer[0][0][0][0].shape)

#所以应该能按照如下方式拿到信息,比如说name,输出为['conv1_1']
print("name:",layer[0][0][0][3]) #name: ['conv1_1']

#查看一下weights的权重,输出(1,2),再次说明第一维是虚的,weights中包含了weight和bias
print("layer[0][0][0][0].shape",layer[0][0][0][0].shape)
print("layer[0][0][0][0].len",len(layer[0][0][0][0]))

#weights[0].shape: (2,),weights[0].len: 2说明两个元素就是weight和bias
print("layer[0][0][0][0][0].shape:",layer[0][0][0][0][0].shape)
print("layer[0][0][0][0].len:",len(layer[0][0][0][0][0]))


weights = layer[0][0][0][0][0]
#解析出weight和bias
weight,bias = weights
#weight.shape: (3, 3, 3, 64)
print("weight.shape:",weight.shape)
#bias.shape: (1, 64)
print("bias.shape:",bias.shape)

print('vgg["normalization"][0][0][0][0][0]',vgg["normalization"][0][0][0][0][0])
# vgg["normalization"][0][0][0][0][0] [123.68  116.779 103.939]
- 1
- 2
- 3
- 4
- 5
- 6
- 7
- 8
- 9
- 10
- 11
- 12
- 13
- 14
- 15
- 16
- 17
- 18
- 19
- 20
- 21
- 22
- 23
- 24
- 25
- 26
- 27
- 28
- 29
- 30
- 31
- 32
- 33
- 34
- 35
- 36
- 37
- 38
- 39
- 40
- 41
- 42
- 43
- 44
- 45
- 46
- 47
- 48
- 49
- 50
- 51
- 52
- 53
- 54
- 55
- 56
- 57
三、构建模型预测图片
3.1 简介
3.2 预测
import tensorflow as tf
import numpy as np
import matplotlib.pyplot as plt
import os
import scipy.io
import scipy.misc
from imagenet_classes import class_names

def _conv_layer(input,weight,bias):
    conv = tf.nn.conv2d(input,weight,strides=[1,1,1,1],padding="SAME")
    return tf.nn.bias_add(conv,bias)
def _pool_layer(input):
    return tf.nn.max_pool(input,ksize=[1,2,2,1],strides=[1,2,2,1],padding="SAME")
def preprocess(image,mean_pixel):
    '''简单预处理,全部图片减去平均值'''
    return image-mean_pixel
def unprocess(image,mean_pixel):
    return image+mean_pixel
def imread(path):
    return scipy.misc.imread(path)
def imsave(image,path):
    img = np.clip(image,0,255).astype(np.int8)
    scipy.misc.imsave(path,image)
def net(data_path,input_image,sess=None):
    """
    读取VGG模型参数,搭建VGG网络
    :param data_path: VGG模型文件位置
    :param input_image: 输入测试图像
    :return:
    """
    layers = (
        'conv1_1', 'conv1_2', 'pool1',
        'conv2_1', 'conv2_2', 'pool2',
        'conv3_1', 'conv3_2', 'conv3_3','conv3_4', 'pool3',
        'conv4_1', 'conv4_2', 'conv4_3','conv4_4', 'pool4',
        'conv5_1', 'conv5_2', 'conv5_3','conv5_4', 'pool5',
          'fc1'  ,   'fc2'  ,   'fc3'  ,
        'softmax'
    )
    data = scipy.io.loadmat(data_path)
    mean = data["normalization"][0][0][0][0][0]
    input_image = np.array([preprocess(input_image, mean)]).astype(np.float32)#去除平均值
    net = {}
    current = input_image
    net["src_image"] = tf.constant(current)  # 存储数据
    count = 0 #计数存储
    for i in range(43):
        if str(data['layers'][0][i][0][0][0][0])[:4] == ("relu"):
            continue
        if str(data['layers'][0][i][0][0][0][0])[:4] == ("pool"):
            current = _pool_layer(current)
        elif str(data['layers'][0][i][0][0][0][0]) == ("softmax"):
            current = tf.nn.softmax(current)
        elif i == (37):
            shape = int(np.prod(current.get_shape()[1:]))
            current = tf.reshape(current, [-1, shape])
            kernels, bias = data['layers'][0][i][0][0][0][0]
            kernels = np.reshape(kernels,[-1,4096])
            bias = bias.reshape(-1)
            current = tf.nn.relu(tf.add(tf.matmul(current,kernels),bias))
        elif i == (39):
            kernels, bias = data['layers'][0][i][0][0][0][0]
            kernels = np.reshape(kernels,[4096,4096])
            bias = bias.reshape(-1)
            current = tf.nn.relu(tf.add(tf.matmul(current,kernels),bias))
        elif i == 41:
            kernels, bias = data['layers'][0][i][0][0][0][0]
            kernels = np.reshape(kernels, [4096, 1000])
            bias = bias.reshape(-1)
            current = tf.add(tf.matmul(current, kernels), bias)
        else:
            kernels,bias = data['layers'][0][i][0][0][0][0]
            #注意VGG存储方式为[,]
            #kernels = np.transpose(kernels,[1,0,2,3])
            bias = bias.reshape(-1)#降低维度
            current = tf.nn.relu(_conv_layer(current,kernels,bias))
        net[layers[count]] = current #存储数据
        count += 1
    return net, mean

if __name__ == '__main__':
    VGG_PATH = os.getcwd()+"/imagenet-vgg-verydeep-19.mat"

    input_image = scipy.misc.imread("234.jpeg")
    input_image = scipy.misc.imresize(input_image,[224,224,3])

    shape = (1, input_image.shape[0], input_image.shape[1], input_image.shape[2])
    #image = tf.placeholder('float', shape=shape)

    with tf.Session() as sess:
        nets, mean_pixel, = net(VGG_PATH, input_image, sess=sess)
        #print(sess.run(nets,feed_dict={image:input_image}))
        nets = sess.run(nets)
        '''
        for key, values in nets.items():
            if len(values.shape)<4:
                continue
            plt.figure(key)
            plt.matshow(values[0, :, :, 0],)
            plt.title(key)
            plt.colorbar()
            plt.show()
        '''
        #打印概率最大的三个数据
        net_sort    = list(reversed(np.argsort(nets["softmax"]).reshape(-1).tolist()))
        net_softmax = nets["softmax"].reshape(-1).tolist()
        for i in range(3):
            print(class_names[net_sort[i]],": ",net_softmax[net_sort[i]])
- 1
- 2
- 3
- 4
- 5
- 6
- 7
- 8
- 9
- 10
- 11
- 12
- 13
- 14
- 15
- 16
- 17
- 18
- 19
- 20
- 21
- 22
- 23
- 24
- 25
- 26
- 27
- 28
- 29
- 30
- 31
- 32
- 33
- 34
- 35
- 36
- 37
- 38
- 39
- 40
- 41
- 42
- 43
- 44
- 45
- 46
- 47
- 48
- 49
- 50
- 51
- 52
- 53
- 54
- 55
- 56
- 57
- 58
- 59
- 60
- 61
- 62
- 63
- 64
- 65
- 66
- 67
- 68
- 69
- 70
- 71
- 72
- 73
- 74
- 75
- 76
- 77
- 78
- 79
- 80
- 81
- 82
- 83
- 84
- 85
- 86
- 87
- 88
- 89
- 90
- 91
- 92
- 93
- 94
- 95
- 96
- 97
- 98
- 99
- 100
- 101
- 102
- 103
- 104
- 105
- 106
- 107
- 108
有趣的事,Python永远不会缺席
欢迎关注小婷儿的博客
文章内容来源于小婷儿的学习笔记,部分整理自网络,若有侵权或不当之处还请谅解
如需转发,请注明出处:小婷儿的博客python https://www.cnblogs.com/xxtalhr/
博客园 https://www.cnblogs.com/xxtalhr/
CSDN https://blog.csdn.net/u010986753
有问题请在博客下留言或加作者:
微信:tinghai87605025 联系我加微信群
QQ :87605025
python QQ交流群:py_data 483766429
所属网站分类: 技术文章 > 博客
作者:23dh
链接:https://www.pythonheidong.com/blog/article/107401/994ebd2f5f5848558437/
来源:python黑洞网
任何形式的转载都请注明出处,如有侵权 一经发现 必将追究其法律责任
昵称:
评论内容:(最多支持255个字符)
---无人问津也好,技不如人也罢,你都要试着安静下来,去做自己该做的事,而不是让内心的烦躁、焦虑,坏掉你本来就不多的热情和定力