

Mask rcnn批量预测自己的测试集图像,去除白边保存和测试集实际大小的数据图像(以DWTT断口预测实验为例)
发布于2019-12-07 10:01 阅读(3626) 评论(0) 点赞(10) 收藏(3)
1.批量预测自己的数据集图像--修改test.py文件
- # -*- coding: utf-8 -*-
- import os
- import sys
- import random
- import math
- import numpy as np
- import skimage.io
- import matplotlib
- matplotlib.use('TkAgg')
- import matplotlib.pyplot as plt
- import cv2
- import time
- from mrcnn.config import Config
- from datetime import datetime
-
- # Root directory of the project
- ROOT_DIR = os.getcwd()
- # Import Mask RCNN
- sys.path.append(ROOT_DIR) # To find local version of the library
- from mrcnn import utils
- import mrcnn.model as modellib
- from mrcnn import visualize
-
- # Directory to save logs and trained model
- MODEL_DIR = os.path.join(ROOT_DIR, "logs")
-
- # Local path to trained weights file
- M_DIR = os.path.abspath("E:/graduation/Mask_RCNN-master/Mask_RCNN-master/maskrcnn_fragility/maskrcnn_fragility/logs/shapes20190604T2347/")
- COCO_MODEL_PATH = os.path.join(M_DIR,"mask_rcnn_shapes_0015.h5")
-
- # Download COCO trained weights from Releases if needed
- if not os.path.exists(COCO_MODEL_PATH):
- utils.download_trained_weights(COCO_MODEL_PATH)
- print("cuiwei***********************")
-
- # Directory of images to run detection on
- IMAGE_DIR = os.path.join(ROOT_DIR, "images")
-
- class ShapesConfig(Config):
- """Configuration for training on the toy shapes dataset.
- Derives from the base Config class and overrides values specific
- to the toy shapes dataset.
- """
- # Give the configuration a recognizable name
- NAME = "fragility"
-
- # Train on 1 GPU and 8 images per GPU. We can put multiple images on each
- # GPU because the images are small. Batch size is 8 (GPUs * images/GPU).
- GPU_COUNT = 1
- IMAGES_PER_GPU = 1
-
- # Number of classes (including background)
- NUM_CLASSES = 1 + 1 # background + 3 shapes
-
- # Use small images for faster training. Set the limits of the small side
- # the large side, and that determines the image shape.
- IMAGE_MIN_DIM = 256
- IMAGE_MAX_DIM = 512
-
- # Use smaller anchors because our image and objects are small
- RPN_ANCHOR_SCALES = (8 * 6, 16 * 6, 32 * 6, 64 * 6, 128 * 6) # anchor side in pixels
-
- # Reduce training ROIs per image because the images are small and have
- # few objects. Aim to allow ROI sampling to pick 33% positive ROIs.
- TRAIN_ROIS_PER_IMAGE =100
-
- # Use a small epoch since the data is simple
- STEPS_PER_EPOCH = 100
-
- # use small validation steps since the epoch is small
- VALIDATION_STEPS = 50
-
- #import train_tongue
-
- class InferenceConfig(ShapesConfig):
- # Set batch size to 1 since we'll be running inference on
- # one image at a time. Batch size = GPU_COUNT * IMAGES_PER_GPU
- GPU_COUNT = 1
- IMAGES_PER_GPU = 1
-
- config = InferenceConfig()
-
- model = modellib.MaskRCNN(mode="inference", model_dir=MODEL_DIR, config=config)
-
-
- # Create model object in inference mode.
- model = modellib.MaskRCNN(mode="inference", model_dir=MODEL_DIR, config=config)
-
- # Load weights trained on MS-COCO
- model.load_weights(COCO_MODEL_PATH, by_name=True)
-
- # COCO Class names
- # Index of the class in the list is its ID. For example, to get ID of
- # the teddy bear class, use: class_names.index('teddy bear')
- class_names = ['BG', 'fragility']
- # Load a random image from the images folder
-
- file_names = next(os.walk(IMAGE_DIR))[2]
-
- image = skimage.io.imread(os.path.join(IMAGE_DIR, random.choice(file_names)))
- #image = skimage.io.imread(os.path.abspath(IMAGE_DIR))
-
- #####################################################################批量图像预测
- count = os.listdir(IMAGE_DIR)
-
- for i in range(0,len(count)):
- path = os.path.join(IMAGE_DIR, count[i])
- if os.path.isfile(path):
- file_names = next(os.walk(IMAGE_DIR))[2]
- image = skimage.io.imread(os.path.join(IMAGE_DIR, count[i]))
- # Run detection
- results = model.detect([image], verbose=1)
- r = results[0]
- visualize.display_instances(count[i],image, r['rois'], r['masks'], r['class_ids'],
- class_names, r['scores'])
-
- #####################################################################批量图像预测
主要修改部分主要集中在最后注释部分的批量图像预测。
2.去除白边保存和测试集实际大小的数据图像-
1) 修改visualize.py文件
- def display_instances(count,image, boxes, masks, class_ids, class_names,
- scores=None, title="",
- figsize=(16, 16), ax=None,
- #figsize=(2.56, 5.12), ax=None,
- show_mask=True, show_bbox=True,
- colors=None, captions=None):
2) 在函数display_instance()的定义中增加一个参数count,此参数和test.py文件中的count[i]参数相对应。为后续的保存文件命名作准备。
- #ax.set_ylim(height + 10, -10) #显示图像的外围边框,保存原始图像大小的数据时需要注释掉
- #ax.set_xlim(-10, width + 10)
-
- ax.axis('off') #关闭坐标轴
对这一部分需要进行注释修改。
3) 对if auto_show:部分进行的修改
- if auto_show:
- ###############保存预测结果图像
-
- fig = plt.gcf()
- fig.set_size_inches(width / 100.0, height / 100.0) # 输出原始图像width*height的像素
- plt.gca().xaxis.set_major_locator(plt.NullLocator())
- plt.gca().yaxis.set_major_locator(plt.NullLocator())
- plt.subplots_adjust(top=1, bottom=0, left=0, right=1, hspace=0, wspace=0)
- plt.margins(0, 0)
-
-
- plt.savefig("E:/graduation/Mask_RCNN-master/Mask_RCNN-master/maskrcnn_fragility/maskrcnn_fragility/test_results/%3s.jpg" % (str(count[7:10])),pad_inches=0.0) #使用原始图像名字的第7到第9个字符来命名新的图像
-
- ###############保存预测结果图像
- #plt.show() #在保存预测结果图像时,如果不想没保存一张显示一次,可以把
- # 他注释掉。
修改完以上各个部分以后就可以进行批量的对自己测试集中的图像进行预测,并以测试集图像大小的像素值将图像进行保存。
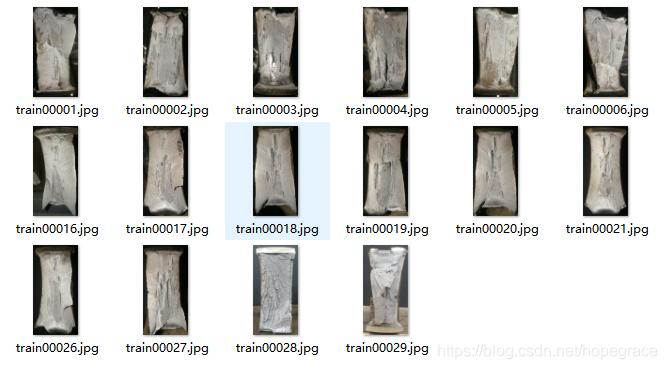
其中测试集中的图像如下所示:
进行预测后保存的结果图像如下所示。
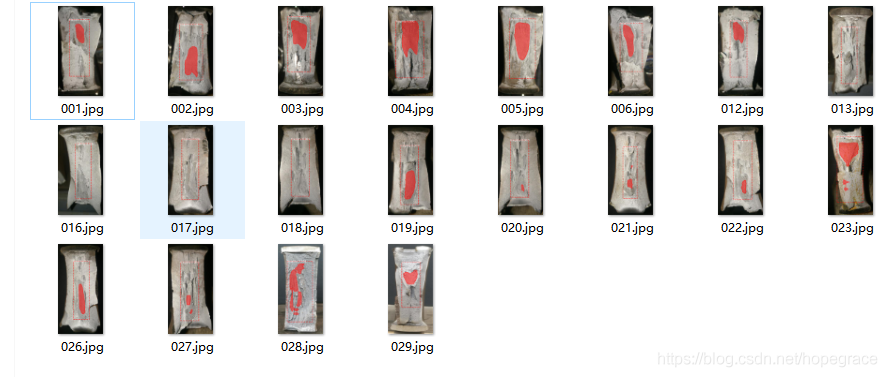
数据集的实际大小时256*512的。
所属网站分类: 技术文章 > 博客
作者:梦
链接:https://www.pythonheidong.com/blog/article/169891/7d1fb9708a5a512e8dad/
来源:python黑洞网
任何形式的转载都请注明出处,如有侵权 一经发现 必将追究其法律责任
昵称:
评论内容:(最多支持255个字符)
---无人问津也好,技不如人也罢,你都要试着安静下来,去做自己该做的事,而不是让内心的烦躁、焦虑,坏掉你本来就不多的热情和定力