

1341
文章
1253824
访问
Faster-r-cnn cpu_tensorflow版 windows系统实现
发布于2019-08-20 11:35 阅读(3227) 评论(2) 点赞(3) 收藏(1)
Faster-r-cnn cpu_tensorflow版 windows系统实现
首先感谢@村民的菜篮子 提供的帮助,我是基于他的脚本改动,然后自己尝试在windows上实现的
转载大佬的博客(基于Ubuntu实现):https://blog.csdn.net/sinat_33486980/article/details/81045315
1.本机环境
win10系统 (新装的系统)
无GPU
tensorflow 版本为1.13.1
cython 版本为0.29.6(编译pyx文件时会用到)
opencv-python 版本为4.1.0.25
easydict 版本为1.9
(PS:最近才开始看faster-r-cnn,上面的库都是新装的,版本可能比较新,opencv包下载慢可以使用清华镜像安装)
使用的python环境为 python 3.7.3,Anaconda装的,编辑器是自带的Spyder
2.demo执行条件
下载github代码与无gpu脚本改动,我就不详细叙述了,具体看文章上面提供的大佬的详细改动就可以了,下面详细说一下windows系统上执行demo脚本报错后,如何解决报错。。。。(因为我电脑环境已经配置完成了,有些报错信息不能恢复了,这里尽可能为你们展示报错信息)
另外,demo.py调用的其他py文件,中会有import cython_cpu_nms 或 import
cython_bbox等,但是并没有cython_bbox这样的文件名,只有
bbox.pyx或cpu_nms.pyx这样的文件名,因此需要把cython_删除掉(也是很莫名其妙!!!)
- 先决条件
已经将coco API下载完毕,以及VGG16的参数权重下载完毕。
coco文件就直接放在 tf-faster-rcnn/data/ 文件夹下(coco脚本运行demo文件可以不用下载吧);
VGG16的参数需要放在 tf-faster-rcnn/tools/ 下,新建一系列文件夹,总体目录为:
tf-faster-rcnn\tools\output\res101\voc_2007_trainval+voc_2012_trainval\default\ 最后default文件夹下面放VGG16的四个参数训练权重文件(否则会报错,找不到权重文件)。
另外,还需安装 Microsoft Visual C++ 14.0,编译pyx文件需要这个软件;明明win10系统里带了这软件,可调用不了,程序开发会报错。。。。哎,还是装一个吧,需不需要安装这个软件,可以尝试安装 lxml 这个包。
pip install lxml
- 1
若是报错,Microsoft Visual C++ 14.0 is required 那就说明电脑里没装。。。这里提供下载地址,也感谢这位大佬
- 接下来可以执行脚本了,选中项目的文件夹,Spyder界面右上角设置

- 运行demo.py文件,第一次报错,如下所示:
  File "E:/faster-r-cnn/tf-faster-rcnn/tools/demo.py", line 20, in <module>
    from model.test import im_detect

  File "E:\faster-r-cnn\tf-faster-rcnn\tools\..\lib\model\test.py", line 24, in <module>
    from model.nms_wrapper import nms

  File "E:\faster-r-cnn\tf-faster-rcnn\tools\..\lib\model\nms_wrapper.py", line 13, in <module>
    from nms.cpu_nms import cpu_nms

ModuleNotFoundError: No module named 'nms.cpu_nms'
- 1
- 2
- 3
- 4
- 5
- 6
- 7
- 8
- 9
- 10
提示没有 nms.cpu_nms这个包,经过检查报错信息,找出 ./lib/nms 文件夹下有个cpu_nms.pyx脚本,pyx文件是python的c扩展文件,代码符合cython的规范,然而并不能直接被py脚本直接import,需要编译才能被python调用(好像虚拟机若是装了cython,可以调用成功,木有试过,Windows系统是报错了)。
解决办法如下:
from distutils.core import setup
from distutils.extension import Extension
from Cython.Distutils import build_ext
import numpy


filename = "cpu_nms" # 源文件名
full_filename = "cpu_nms.pyx" # 包含后缀的源文件名

setup(
    cmdclass = {'build_ext': build_ext},
    ext_modules = [Extension(filename, [full_filename])], # 配置需要cython编译的源文件
    include_dirs = [numpy.get_include()]
- 1
- 2
- 3
- 4
- 5
- 6
- 7
- 8
- 9
- 10
- 11
- 12
- 13
编写setup_cpu_nms.py文件,如上代码,anaconda里自带了包,不需要安装,命令行执行该脚本,执行方式:
python setup_cpu_nms.py build_ext --inplace
- 1
出现如下信息,即说明编译成功
running build_ext
skipping 'cpu_nms.c' Cython extension (up-to-date)
building 'cpu_nms' extension
creating build
creating build\temp.win-amd64-3.7
creating build\temp.win-amd64-3.7\Release
C:\Program Files (x86)\Microsoft Visual Studio 14.0\VC\BIN\x86_amd64\cl.exe /c /nologo /Ox /W3 /GL /DNDEBUG /MD -IE:\anaconda\python3.7\lib\site-packages\numpy\core\include -IE:\anaconda\python3.7\include -IE:\anaconda\python3.7\include "-IC:\Program Files (x86)\Microsoft Visual Studio 14.0\VC\INCLUDE" "-IC:\Program Files (x86)\Windows Kits\10\include\10.0.10240.0\ucrt" "-IC:\Program Files (x86)\Windows Kits\8.1\include\shared" "-IC:\Program Files (x86)\Windows Kits\8.1\include\um" "-IC:\Program Files (x86)\Windows Kits\8.1\include\winrt" /Tccpu_nms.c /Fobuild\temp.win-amd64-3.7\Release\cpu_nms.obj
cpu_nms.c
e:\anaconda\python3.7\lib\site-packages\numpy\core\include\numpy\npy_1_7_deprecated_api.h(14) : Warning Msg: Using deprecated NumPy API, disable it with #define NPY_NO_DEPRECATED_API NPY_1_7_API_VERSION
cpu_nms.c(2345): warning C4244: '=': conversion from 'npy_intp' to 'int', possible loss of data
cpu_nms.c(2435): warning C4244: '=': conversion from '__pyx_t_5numpy_intp_t' to 'int', possible loss of data
cpu_nms.c(2611): warning C4244: '=': conversion from '__pyx_t_5numpy_intp_t' to 'int', possible loss of data
cpu_nms.c(2734): warning C4244: 'function': conversion from 'double' to '__pyx_t_5numpy_float32_t', possible loss of data
cpu_nms.c(2743): warning C4244: 'function': conversion from 'double' to '__pyx_t_5numpy_float32_t', possible loss of data
C:\Program Files (x86)\Microsoft Visual Studio 14.0\VC\BIN\x86_amd64\link.exe /nologo /INCREMENTAL:NO /LTCG /DLL /MANIFEST:EMBED,ID=2 /MANIFESTUAC:NO /LIBPATH:E:\anaconda\python3.7\libs /LIBPATH:E:\anaconda\python3.7\PCbuild\amd64 "/LIBPATH:C:\Program Files (x86)\Microsoft Visual Studio 14.0\VC\LIB\amd64" "/LIBPATH:C:\Program Files (x86)\Windows Kits\10\lib\10.0.10240.0\ucrt\x64" "/LIBPATH:C:\Program Files (x86)\Windows Kits\8.1\lib\winv6.3\um\x64" /EXPORT:PyInit_cpu_nms build\temp.win-amd64-3.7\Release\cpu_nms.obj /OUT:E:\faster-r-cnn\tf-faster-rcnn\lib\nms\cpu_nms.cp37-win_amd64.pyd /IMPLIB:build\temp.win-amd64-3.7\Release\cpu_nms.cp37-win_amd64.lib
cpu_nms.obj : warning LNK4197: export 'PyInit_cpu_nms' specified multiple times; using first specification
   Creating library build\temp.win-amd64-3.7\Release\cpu_nms.cp37-win_amd64.lib and object build\temp.win-amd64-3.7\Release\cpu_nms.cp37-win_amd64.exp
Generating code
Finished generating code
- 1
- 2
- 3
- 4
- 5
- 6
- 7
- 8
- 9
- 10
- 11
- 12
- 13
- 14
- 15
- 16
- 17
- 18
- 19
打开nms文件夹,发现cpu_nms.pyx编译成功后生成2个文件,cpu_nms.c 与 cpu_nms.cp37-win_amd64.pyd 文件,此时的pyd文件才可以被python成功的import。
-
/lib/utils/bbox.pyx 该文件报错信息与cpu_nms.pyx一致,也需要像上面的处理方式处理,这里就不多做叙述了
-
接下来再次运行demo脚本。。。。又报错了,不过好在是最后一个错误了
  File "E:/faster-r-cnn/tf-faster-rcnn/tools/demo.py", line 98, in demo
    keep = nms(dets, NMS_THRESH)

  File "E:\faster-r-cnn\tf-faster-rcnn\tools\..\lib\model\nms_wrapper.py", line 23, in nms
    return cpu_nms(dets, thresh)

  File "cpu_nms.pyx", line 25, in cpu_nms.cpu_nms

ValueError: Buffer dtype mismatch, expected 'int_t' but got 'long long'
- 1
- 2
- 3
- 4
- 5
- 6
- 7
- 8
- 9
经度娘翻译,valueerror:缓冲区数据类型不匹配,应为“int_t”,但具有“long long”
倒数第二行,发现还是 cpu_nms.pyx文件的错误,百度得到方法:
 24 cdef np.ndarray[np.float32_t, ndim=1] areas = (x2 - x1 + 1) * (y2 - y1 + 1)
 25 cdef np.ndarray[np.int_t, ndim=1] order = scores.argsort()[::-1]
 26
 27 cdef int ndets = dets.shape[0]
 28 cdef np.ndarray[np.int_t, ndim=1] suppressed = \
 29         np.zeros((ndets), dtype=np.int)
- 1
- 2
- 3
- 4
- 5
- 6
更改该文件 25行 "np.int_t " 改为 “np.intp_t”,第28行 "np.int_t "不要动,重新编译该文件,执行demo文件。。。终于全部执行通过!!!
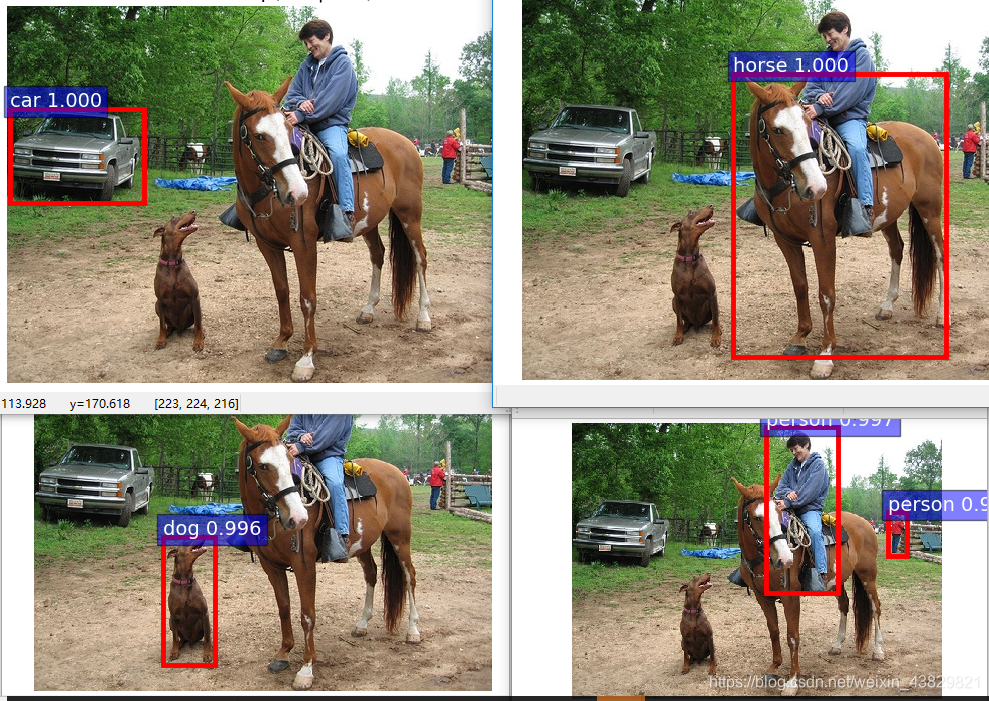
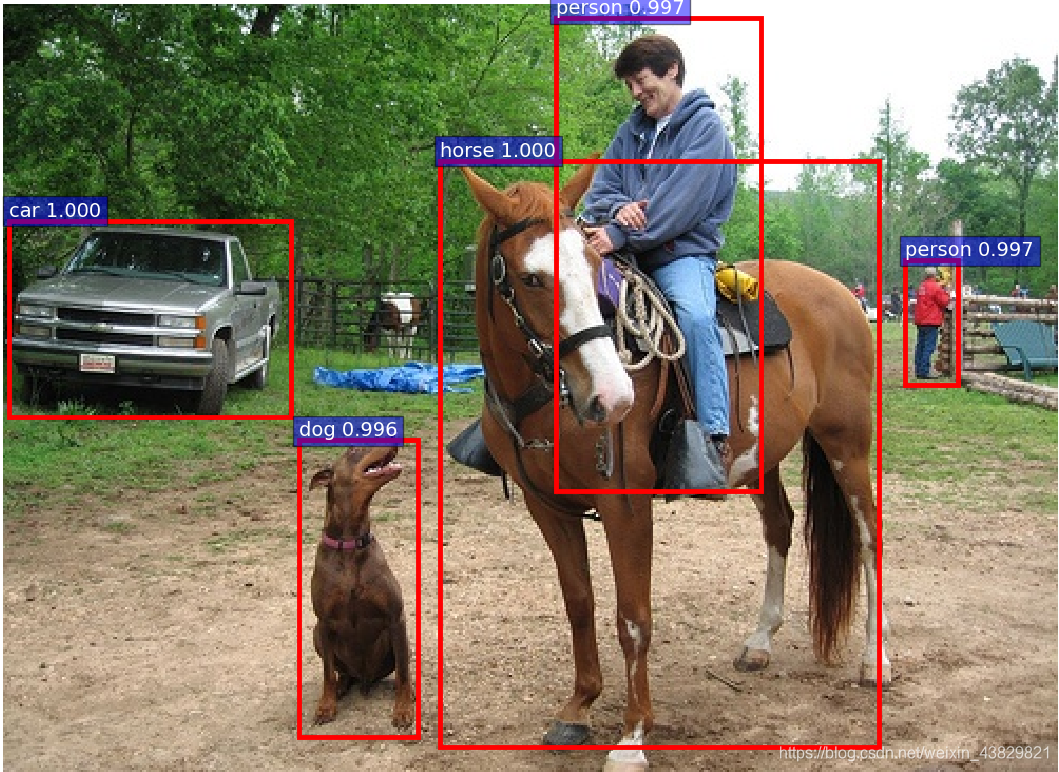
这里只选了最后一张图,结果显示该图识别出来的人、车、马,狗四块,切分出来,并显示其概率;这里我做了下修改,使其显示在同一张图片上。只修改了demo.py文件中的vis_detections 与demo俩个函数中小小的一部分,脚本如下:
def vis_detections(ax, class_name, dets, thresh=0.5):
    """Draw detected bounding boxes."""
    inds = np.where(dets[:, -1] >= thresh)[0]
    if len(inds) == 0:
        return

    for i in inds:
        bbox = dets[i, :4]
        score = dets[i, -1]

        ax.add_patch(
            plt.Rectangle((bbox[0], bbox[1]),
                          bbox[2] - bbox[0],
                          bbox[3] - bbox[1], fill=False,
                          edgecolor='red', linewidth=3.5)
            )
        ax.text(bbox[0], bbox[1] - 2,
                '{:s} {:.3f}'.format(class_name, score),
                bbox=dict(facecolor='blue', alpha=0.5),
                fontsize=14, color='white')

    plt.axis('off')
    plt.tight_layout()
    plt.draw()

def demo(sess, net, image_name):
    """Detect object classes in an image using pre-computed object proposals."""

    # Load the demo image
    im_file = os.path.join(cfg.DATA_DIR, 'demo', image_name)
    im = cv2.imread(im_file)

    # Detect all object classes and regress object bounds
    timer = Timer()
    timer.tic()
    scores, boxes = im_detect(sess, net, im)
    timer.toc()
    print('Detection took {:.3f}s for {:d} object proposals'.format(timer.total_time, boxes.shape[0]))

    # Visualize detections for each class
    CONF_THRESH = 0.8
    NMS_THRESH = 0.3

    im = im[:, :, (2, 1, 0)]
    fig, ax = plt.subplots(figsize=(12, 12))
    ax.imshow(im, aspect='equal')
    plt.ion()
    for cls_ind, cls in enumerate(CLASSES[1:]):
        cls_ind += 1 # because we skipped background
        cls_boxes = boxes[:, 4*cls_ind:4*(cls_ind + 1)]
        cls_scores = scores[:, cls_ind]
        dets = np.hstack((cls_boxes,
                          cls_scores[:, np.newaxis])).astype(np.float32)
        keep = nms(dets, NMS_THRESH)
        dets = dets[keep, :]

        vis_detections(ax, cls, dets, thresh=CONF_THRESH)
- 1
- 2
- 3
- 4
- 5
- 6
- 7
- 8
- 9
- 10
- 11
- 12
- 13
- 14
- 15
- 16
- 17
- 18
- 19
- 20
- 21
- 22
- 23
- 24
- 25
- 26
- 27
- 28
- 29
- 30
- 31
- 32
- 33
- 34
- 35
- 36
- 37
- 38
- 39
- 40
- 41
- 42
- 43
- 44
- 45
- 46
- 47
- 48
- 49
- 50
- 51
- 52
- 53
- 54
- 55
- 56
- 57
最后出来结果:
所属网站分类: 技术文章 > 博客
作者:熊猫烧香
链接:https://www.pythonheidong.com/blog/article/49104/2ccd09d0cfe2b6a7f0db/
来源:python黑洞网
任何形式的转载都请注明出处,如有侵权 一经发现 必将追究其法律责任
昵称:
评论内容:(最多支持255个字符)
---无人问津也好,技不如人也罢,你都要试着安静下来,去做自己该做的事,而不是让内心的烦躁、焦虑,坏掉你本来就不多的热情和定力