

复写 keras_resnet 在cifar10数据集上分类
发布于2019-08-06 11:38 阅读(1119) 评论(0) 点赞(3) 收藏(5)
1.keras(resnet):https://github.com/keras-team/keras/blob/master/examples/cifar10_resnet.py
2.用到的cifar10数据集和模型权重链接:https://pan.baidu.com/s/1L4oZAPg_9B_YipPeihmBwQ 提取码:8jcw
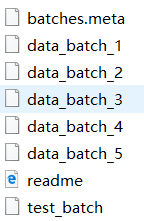
5个data_batch文件,每个1万数据

0.导入库
# 加入下面2行,可以使py代码文件中的修改即时生效
%load_ext autoreload
%autoreload 2
# 下行如果python2使用print,也得加上括号
from __future__ import print_function
import keras
# 导入keras库的这4种层:全连接层Dense,2维卷积层Conv2D,批量归一化层BatchNormalization,激活层Activation
from keras.layers import Dense, Conv2D, BatchNormalization, Activation
# 导入keras库的这3种层:平均2维池化层AveratePooling2D, 输入层Input,激活层Activation
from keras.layers import AveragePooling2D, Input, Flatten
# 导入keras库的优化器:Adam优化器
from keras.optimizers import Adam
# 导入keras库的回传函数:模型检查点ModelCheckpoint, LearningRateScheduler
from keras.callbacks import ModelCheckpoint, LearningRateScheduler
# 导入keras库的回传函数:学习率递减ReduceLROnPlateau
from keras.callbacks import ReduceLROnPlateau
# 导入keras库的图片处理函数:图片数据生成器
from keras.preprocessing.image import ImageDataGenerator
# 导入keras库的正则化函数:L2正则化
from keras.regularizers import l2
# 导入keras库的后端:backend中文叫做后端,取别名为K
from keras import backend as K
# 导入keras库的模型函数:Model
from keras.models import Model
# 导入keras库的数据集类:cifar10
from keras.datasets import cifar10
# 导入必需的常用库
import numpy as np
import os
1.数据准备
1.1加载训练集
官方代码没有指定路径:

from keras.datasets.cifar import load_batch #load_batch用于加载指定路径
## 加载数据集cifar10里面的训练集
def load_train_dataset(dirPath='../resources/cifar-10-batches-py/'):
    train_sample_quantity = 50000
    image_width = 32
    image_height = 32
    channel_quantity = 3
    train_X = np.zeros((train_sample_quantity, channel_quantity, image_width, image_height),
                       dtype='uint8')
    train_y = np.zeros((train_sample_quantity, ),
                       dtype='uint8')  #下面循环写入相同大小零矩阵
    for i in range(1, 6):
        fileName = 'data_batch_%d' %i  #看文件名格式
        filePath = os.path.join(dirPath, fileName)
        startIndex = (i - 1) * 10000
        endIndex = i * 10000             #用到了load_batch,训练集定义5万,循环5次,0-1万行,1万-2万行....
        train_X[startIndex:endIndex, :, :, :], train_y[startIndex:endIndex] = load_batch(filePath)

    print('train_X矩阵转置前:', train_X.shape)
    # 从官网上下载的数据集的4个维度为样本个数n、通道数c、宽度w、高度h
    # Keras基于Tensorflow,数据的维度顺序要求:样本个数n、宽度w、高度h、通道数c,所以使用np.transpose完成矩阵转置
    train_X = train_X.transpose(0, 2, 3, 1)
    print('train_X矩阵转置后:', train_X.shape)
    return train_X, train_y

dirPath = '../resources/cifar-10-batches-py/'
train_imageData, train_y = load_train_dataset()

1.2加载测试集
# 加载数据集cifar10里面的测试集
def load_test_dataset(dirPath='../resources/cifar-10-batches-py/'):
    fileName = 'test_batch'
    filePath = os.path.join(dirPath, fileName)
    test_X, test_y = load_batch(filePath)
    print('test_X矩阵转置前:', test_X.shape)
    test_X = test_X.transpose(0, 2, 3, 1)
    print('test_X矩阵转置后:', test_X.shape)
    return test_X, test_y

dirPath = '../resources/cifar-10-batches-py/'
test_imageData, test_y = load_test_dataset()

1.3对类别做One-Hot编码
# 对类别ID做One-Hot编码
from keras.utils import to_categorical

class_quantity = 10
train_Y = to_categorical(train_y, class_quantity)
test_Y = to_categorical(test_y, class_quantity)
1.4对图片像素的0-255值做归一化,并减去均值
train_X = train_imageData.astype('float32') / 255
test_X = test_imageData.astype('float32') / 255
pixel_mean = np.mean(train_X, axis=0)
print('pixel_mean.shape:', pixel_mean.shape)
train_X = train_X - pixel_mean
test_X = test_X - pixel_mean

2.搭建神经网络
2.1定义函数resnet_layer,返回值是经过resnet_layer计算的结果
def resnet_layer(inputs, #定义了一层resnet_layer
num_filters=16,
kernel_size=3,
strides=1,
activation='relu',
batch_normalization=True,
conv_first=True):
conv = Conv2D(num_filters,
kernel_size=kernel_size,
strides=strides,
padding='same',
kernel_initializer='he_normal',
kernel_regularizer=l2(1e-4))
x = inputs
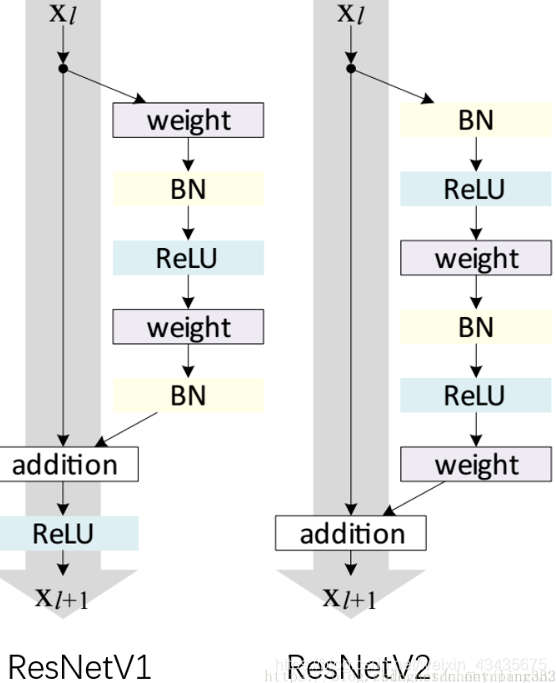
if conv_first: #为resnet V1
x = conv(x) #conv为一函数,相当于下图weight
if batch_normalization:
x = BatchNormalization()(x)
if activation is not None:
x = Activation(activation)(x)
else: #为resnet V2
if batch_normalization:
x = BatchNormalization()(x) #BatchNormalization()实例化一个函数对象
if activation is not None:
x = Activation(activation)(x)
x = conv(x)
return x
2.2 定义函数resnet_v1,返回值是模型对象
def resnet_v1(input_shape, depth, num_classes=10):
    if (depth - 2) % 6 != 0:
        raise ValueError('depth should be 6n+2 (eg 20, 32, 44 in [a])')
    # Start model definition.
    num_filters = 16
    num_res_blocks = int((depth - 2) / 6)

    inputs = Input(shape=input_shape)
    x = resnet_layer(inputs=inputs)
    # Instantiate the stack of residual units
    for stack in range(3):
        for res_block in range(num_res_blocks):
            strides = 1
            if stack > 0 and res_block == 0:  # first layer but not first stack
                strides = 2  # downsample
            y = resnet_layer(inputs=x,
                             num_filters=num_filters,
                             strides=strides)
            y = resnet_layer(inputs=y,
                             num_filters=num_filters,
                             activation=None)
            if stack > 0 and res_block == 0:  # first layer but not first stack
                # linear projection residual shortcut connection to match
                # changed dims
                x = resnet_layer(inputs=x,
                                 num_filters=num_filters,
                                 kernel_size=1,
                                 strides=strides,
                                 activation=None,
                                 batch_normalization=False)
            x = keras.layers.add([x, y])
            x = Activation('relu')(x)
        num_filters *= 2
    # Add classifier on top.
    # v1 does not use BN after last shortcut connection-ReLU
    x = AveragePooling2D(pool_size=8)(x)
    y = Flatten()(x)
    outputs = Dense(num_classes,
                    activation='softmax',
                    kernel_initializer='he_normal')(y)

    # Instantiate model.
    model = Model(inputs=inputs, outputs=outputs)
    return model
2.3定义函数resnet_v2,返回值是模型对象
def resnet_v2(input_shape, depth, num_classes=10):
    if (depth - 2) % 9 != 0:#深度必须是9n+2,比如20层,56层,110层
        raise ValueError('depth should be 9n+2 (eg 56 or 110 in [b])')
    # Start model definition.
    num_filters_in = 16 # 卷积核数量
    num_res_blocks = int((depth - 2) / 9)
    inputs = Input(shape=input_shape)

    x = resnet_layer(inputs=inputs,  # resnet lay 0如下表,第一次调用了一层resnet_layer
                     num_filters=num_filters_in,
                     conv_first=True)

    # Instantiate the stack of residual units 实例化剩余单元的堆栈
    for stage in range(3):
        for res_block in range(num_res_blocks):
            activation = 'relu'
            batch_normalization = True
            strides = 1
            if stage == 0:
            #如果stage和res_block == 0,不进行activation,batch_normalization,
                num_filters_out = num_filters_in * 4
                if res_block == 0:  # first layer and first stage
                    activation = None
                    batch_normalization = False
            else:
                num_filters_out = num_filters_in * 2
                if res_block == 0:  # first layer but not first stage
                    strides = 2    # downsample
            # bottleneck residual unit
            y = resnet_layer(inputs=x,
                             num_filters=num_filters_in,
                             kernel_size=1,
                             strides=strides,
                             activation=activation,
                             batch_normalization=batch_normalization,
                             conv_first=False)
            y = resnet_layer(inputs=y,
                             num_filters=num_filters_in,
                             conv_first=False)
            y = resnet_layer(inputs=y,
                             num_filters=num_filters_out,
                             kernel_size=1,
                             conv_first=False)
            if res_block == 0:
                # linear projection residual shortcut connection to match
                # changed dims
                x = resnet_layer(inputs=x,
                                 num_filters=num_filters_out,
                                 kernel_size=1,
                                 strides=strides,
                                 activation=None,
                                 batch_normalization=False)
            x = keras.layers.add([x, y]) #实现shotcut

        num_filters_in = num_filters_out
    #如上三个resnet_layer调用一个shotcut

    # Add classifier on top.
    # v2 has BN-ReLU before Pooling
    x = BatchNormalization()(x)  #如下三行代码对应下表对应后面几行
    x = Activation('relu')(x)
    x = AveragePooling2D(pool_size=8)(x)
    y = Flatten()(x)
    outputs = Dense(num_classes,
                    activation='softmax',
                    kernel_initializer='he_normal')(y)

    # Instantiate model.
    model = Model(inputs=inputs, outputs=outputs)
    return model
2.4实例化模型对象
# Model version
# Orig paper: version = 1 (ResNet v1), Improved ResNet: version = 2 (ResNet v2)
version = 2
# Computed depth from supplied model parameter n
n = 2
if version == 1:
    depth = n * 6 + 2
elif version == 2:
    depth = n * 9 + 2

# 根据ResNet版本,获取对应的模型对象
if version == 2:
    model = resnet_v2(input_shape=input_shape, depth=depth)
else:
    model = resnet_v1(input_shape=input_shape, depth=depth)
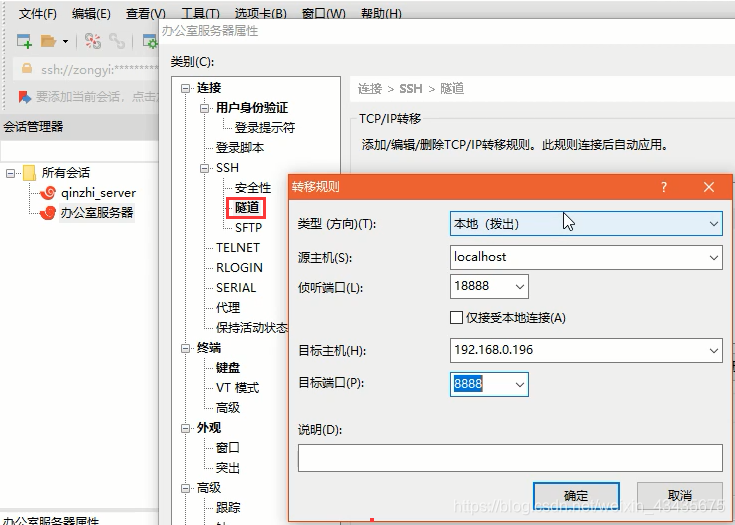
2.5多GPU并行训练
https://github.com/matterport/Mask_RCNN/blob/master/mrcnn/parallel_model.py
打开parallel_model.py文件,在原来文件加入红点一行:
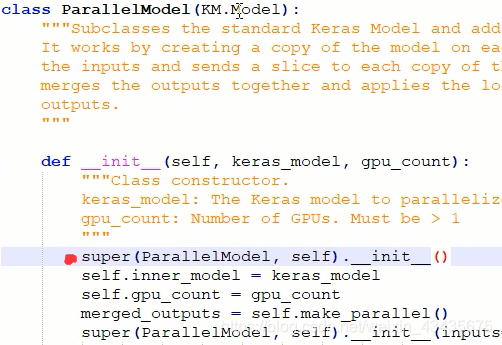
from parallel_model import ParallelModel

gpu_count = 2
model = ParallelModel(model, gpu_count)
model.compile(loss='categorical_crossentropy',
              optimizer=Adam(lr=0.001),
              metrics=['accuracy'])
2.6打印模型架构信息
# Model name, depth and version
model_type = 'ResNet%dv%d' % (depth, version)
print(model_type)
model.summary()
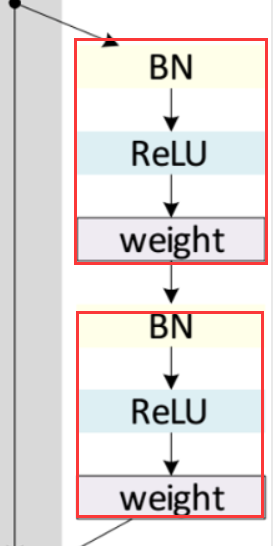
如下所示三个resnet_layer为一个shotcut,但如上图是两个layer再加,作者用的三个效果更好
用于数据集cifar10的图像分类网络ResNet20v2架构

    处理层_0: 输入层,调用keras.layers中的Input类,通过传递参数shape实例化对象
    数据层_0:矩阵形状:              N x 32 x 32 x 3

resnet_layer_0 #对应2.3节第一个x = resnet_layer  #第一个3表示上层通道数或卷积核fliter数
        处理层_1:conv2d_1      卷积核形状:        3 x 3 x 3 x 16 / 1
 #输入3大小3*3输出16,步长1,因为输出是16,所以加16个b
 #所以3*3*3*16=432(卷积核占的参数量)再加16为第一层conv2d_1参数个数448
    数据层_1:矩阵形状:              N x 32 x 32 x 16  #None表示batch size
        处理层_2:batch_normalization_1
    数据层_2: 矩阵形状:              N x 32 x 32 x 16
        处理层_3:activation_1
    数据层_3:矩阵形状:              N x 32 x 32 x 16


resnet_layer_1
        处理层_4:conv2d_2      卷积核形状:        16 x 1 x 1 x 16 / 1
    数据层_4:矩阵形状:              N x 32 x 32 x 16


resnet_layer_2
        处理层_5:batch_normalization_2
    数据层_5:矩阵形状:              N x 32 x 32 x 16
        处理层_6:activation_2
    数据层_6: 矩阵形状:              N x 32 x 32 x 16
        处理层_7:conv2d_3      卷积核形状:         16 x 3 x 3 x 16 / 1
    数据层_7:矩阵形状:              N x 32 x 32 x 16


resnet_layer_3
        处理层_8: batch_normalization_3
    数据层_8:矩阵形状:               N x 32 x 32 x 16
        处理层_9:activation_3
    数据层_9:矩阵形状:               N x 32 x 32 x 16
        处理层_10:conv2d_4     卷积核形状:       16 x 1 x 1 x 64 / 1
    数据层_10:矩阵形状:              N x 32 x 32 x 64


shortcut_1 #不默认对上层处理,取指定层处理,相加,route_1是自己定义的
        处理层_11:route_1   取数据层_3 #数据层_3和下行数据层_11是同一层
    数据层_11:矩阵形状:            N x 32 x 32 x 16
        处理层_12:conv2d_5     卷积核形状:       16 x 1 x 1 x 64 / 1
        #(32-1+0)/1 +1=32,公式里第一个32表示上层长32,第二个32是得出这层长
        #N x 32 x 32 x 16经过16 x 1 x 1 x 64 / 1处理得出N x 32 x 32 x 64即下行
    数据层_12:矩阵形状:            N x 32 x 32 x 64
        处理层_13:add_1     把数据层_10、数据层_12相加
    数据层_13:矩阵形状:            N x 32 x 32 x 64

///////////////////////////////////////////////////////////////////////

resnet_layer_4
        处理层_14:batch_normalization_4
    数据层_14:矩阵形状:             N x 32 x 32 x 64
        处理层_15:activation_4
    数据层_15:矩阵形状:             N x 32 x 32 x 64
        处理层_16:conv2d_6    卷积核形状:        64 x 1 x 1 x 16 / 1
    数据层_16:矩阵形状:             N x 32 x 32 x 16


resnet_layer_5
        处理层_17:batch_normalization_5
    数据层_17:矩阵形状:             N x 32 x 32 x 16
        处理层_18:activation_5
    数据层_18:矩阵形状:             N x 32 x 32 x 16
        处理层_19:conv2d_7    卷积核形状:        16 x 3 x 3 x 16 / 1
    数据层_19:矩阵形状:             N x 32 x 32 x 16


resnet_layer_6
        处理层_20:batch_normalization_6
    数据层_20:矩阵形状:           N x 32 x 32 x 16
        处理层_21:activation_6
    数据层_21:矩阵形状:            N x 32 x 32 x 16
        处理层_22:conv2d_8    卷积核形状:       16 x 1 x 1 x 64 / 1
    数据层_22:矩阵形状:           N x 32 x 32 x 64


shortcut_2
        处理层_23:add_2     把数据层_22、数据层_13相加
    数据层_23:矩阵形状:            N x 32 x 32 x 64

//////////////////////////////////////////////////////////////////////

resnet_layer_7
        处理层_24:batch_normalization_7
    数据层_24:矩阵形状:            N x 32 x 32 x 64
        处理层_25:activation_7
    数据层_25:矩阵形状:            N x 32 x 32 x 64
        处理层_26:conv2d_9     卷积核形状:      64 x 1 x 1 x 64 / 2
    数据层_26:矩阵形状:           N x 16 x 16 x 64 #通道扩展指最后位64变大,
                                                   #下采样指由32*32变为16*16

resnet_layer_8
        处理层_25:batch_normalization_8
    数据层_25:矩阵形状:            N x 16 x 16 x 64
        处理层_26:activation_8
    数据层_26:矩阵形状:            N x 16 x 16 x 64
        处理层_27:conv2d_10    卷积核形状:      64 x 3 x 3 x 64 / 1
    数据层_27:矩阵形状:            N x 16 x 16 x 64

resnet_layer_9
        处理层_28:batch_normalization_9
    数据层_28:矩阵形状:           N x 16 x 16 x 64
        处理层_29:activation_9
    数据层_29:矩阵形状             N x 16 x 16 x 64
        处理层_30:conv2d_11    卷积核形状:      64 x 1 x 1 x 128 / 1
    数据层_30:矩阵形状             N x 16 x 16 x 128

shortcut_3
        处理层_31:route_2        取数据层_23
    数据层_31:矩阵形状:            N x 32 x 32 x 64
        处理层_32:conv2d_12    卷积核形状:      64 x 1 x 1 x 128 / 2
    数据层_32:矩阵形状:           N x 16 x 16 x 128
        处理层_33:add_3        把数据层_32、数据层_30相加
    数据层_33:矩阵形状:           N x 16 x 16 x 128

////////////////////////////////////////////////////////////////////

resnet_layer_10
        处理层_34:batch_normalization_10
    数据层_34:矩阵形状:            N x 16 x 16 x 128
        处理层_35:activation_10
    数据层_35:矩阵形状:            N x 16 x 16 x 128
        处理层_36:conv2d_13    卷积核形状:      128 x 1 x 1 x 64 / 1
    数据层_36:矩阵形状:            N x 16 x 16 x 64

resnet_layer_11
        处理层_37:batch_normalization_11
    数据层_37:矩阵形状:            N x 16 x 16 x 64
        处理层_38:activation_11
    数据层_38:矩阵形状:            N x 16 x 16 x 64
        处理层_39:conv2d_14    卷积核形状:       64 x 3 x 3 x 64 / 1
    数据层_39:矩阵形状:            N x 16 x 16 x 64

resnet_layer_12
        处理层_40:batch_normalization_12
    数据层_40:矩阵形状:            N x 16 x 16 x 64
        处理层_41:activation_12
    数据层_41:矩阵形状:            N x 16 x 16 x 64
        处理层_42:conv2d_15    卷积核形状:       64 x 1 x 1 x 128 / 1
    数据层_42:矩阵形状:            N x 16 x 16 x 128

shortcut_4
        处理层_43:add_4        把数据层_42、数据层_33相加
    数据层_43:矩阵形状:           N x 16 x 16 x 128

/////////////////////////////////////////////////////////////////////////

resnet_layer_13
        处理层_44:batch_normalization_13
    数据层_44:矩阵形状:            N x 16 x 16 x 128
        处理层_45:activation_13
    数据层_45:矩阵形状:            N x 16 x 16 x 128
        处理层_46:conv2d_16    卷积核形状:       128 x 1 x 1 x 128 / 2
    数据层_46:矩阵形状:            N x 8 x 8 x 128

resnet_layer_14
        处理层_47:batch_normalization_14
    数据层_47:矩阵形状:            N x 8 x 8 x 128
        处理层_48:activation_14
    数据层_48:矩阵形状:            N x 8 x 8 x 128
        处理层_49:conv2d_17    卷积核形状:     128 x 3 x 3 x 128 / 1
    数据层_49:矩阵形状:            N x 8 x 8 x 128

resnet_layer_15
        处理层_50:batch_normalization_15
    数据层_50:矩阵形状:            N x 8 x 8 x 128
        处理层_51:activation_15
    数据层_51:矩阵形状:            N x 8 x 8 x 128
        处理层_52:conv2d_18    卷积核形状:     128 x 1 x 1 x 256 / 1
    数据层_52:矩阵形状:            N x 8 x 8 x 256

shortcut_5
        处理层_53:route_3          取数据层_43
    数据层_53:矩阵形状:            N x 16 x 16 x 128
        处理层_54:conv2d_19    卷积核形状:      128 x 1 x 1 x 256 / 2
    数据层_54:矩阵形状:            N x 8 x 8 x 256
        处理层_55:add_5        把数据层_54、数据层_52相加
    数据层_55:矩阵形状:           N x 8 x 8 x 256

////////////////////////////////////////////////////////////////////////

resnet_layer_16
        处理层_56:batch_normalization_16
    数据层_56:矩阵形状:            N x 8 x 8 x 256
        处理层_57:activation_16
    数据层_57:矩阵形状:            N x 8 x 8 x 256
        处理层_58:conv2d_20    卷积核形状:     256 x 1 x 1 x 128 / 1
    数据层_58:矩阵形状:            N x 8 x 8 x 128

resnet_layer_17
        处理层_59:batch_normalization_17
    数据层_59:矩阵形状:            N x 8 x 8 x 128
        处理层_60:activation_17
    数据层_60:矩阵形状:            N x 8 x 8 x 128
        处理层_61:conv2d_21    卷积核形状:     128 x 3 x 3 x 128 / 1
    数据层_61:矩阵形状:            N x 8 x 8 x 128

resnet_layer_18
        处理层_62:batch_normalization_18
    数据层_62:矩阵形状:            N x 8 x 8 x 128
        处理层_63:activation_18
    数据层_63:矩阵形状:            N x 8 x 8 x 128
        处理层_64:conv2d_22    卷积核形状:     128 x 1 x 1 x 256 / 1
    数据层_64:矩阵形状:            N x 8 x 8 x 256

shortcut_6  #18层每3次一共做了6次shortcut
        处理层_62:add_6        把数据层_64、数据层_55相加
    数据层_62:矩阵形状:           N x 8 x 8 x 256

/////////////////////////////////////////////////////////////////////

classifier#如果是yoloV3就是yolo层了
        处理层_63:batch_normalization_19
    数据层_63:矩阵形状:           N x 8 x 8 x 256
        处理层_64:activation_19
    数据层_64:矩阵形状:           N x 8 x 8 x 256
        处理层_65:average_pooling2d_1
    数据层_65:矩阵形状:           N x 1 x 1 x 256
        处理层_66:flatten_1
    数据层_66:矩阵形状:           N x 256
        处理层_67:dense_1
    数据层_67:矩阵形状:           N x 10
所以ResNet20_V2:这个20是conv共19层(layer0)+dense1层
3.模型训练
3.1规划学习率(训练到后期时学习率需减小)
def lr_schedule(epoch):
    lr = 1e-3
    if epoch > 180:
        lr *= 0.5e-3
    elif epoch > 160:
        lr *= 1e-3
    elif epoch > 120:
        lr *= 1e-2
    elif epoch > 80:
        lr *= 1e-1
    print('Learning rate: ', lr)
    return lr
3.2模型训练时的参数设置
# Training parameters
batch_size = 64 # orig paper trained all networks with batch_size=128
epochs = 200
# Prepare model model saving directory.
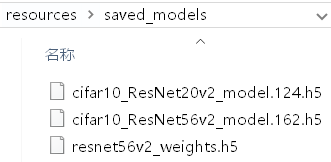
save_dir = os.path.abspath('../resources/saved_models')
model_name = 'cifar10_%s_model.{epoch:03d}.h5' % model_type
if not os.path.isdir(save_dir):
os.makedirs(save_dir)
filepath = os.path.join(save_dir, model_name)
# Prepare callbacks for model saving and for learning rate adjustment.
checkpoint = ModelCheckpoint(filepath=filepath,
monitor='val_acc',
verbose=0,
save_best_only=True)
lr_scheduler = LearningRateScheduler(lr_schedule)
lr_reducer = ReduceLROnPlateau(factor=np.sqrt(0.1),
cooldown=0,
patience=5,
min_lr=0.5e-6)
callbacks = [checkpoint, lr_reducer, lr_scheduler]
3.3使用图像增强的结果做模型训练
data_augmentation = True
if data_augmentation:
    print('Using real-time data augmentation.')
    # This will do preprocessing and realtime data augmentation:
    datagen = ImageDataGenerator(
        # set input mean to 0 over the dataset
        featurewise_center=False,
        # set each sample mean to 0
        samplewise_center=False,
        # divide inputs by std of dataset
        featurewise_std_normalization=False,
        # divide each input by its std
        samplewise_std_normalization=False,
        # apply ZCA whitening
        zca_whitening=False,
        # epsilon for ZCA whitening
        zca_epsilon=1e-06,
        # randomly rotate images in the range (deg 0 to 180)
        rotation_range=0,
        # randomly shift images horizontally
        width_shift_range=0.1,
        # randomly shift images vertically
        height_shift_range=0.1,
        # set range for random shear
        shear_range=0.,
        # set range for random zoom
        zoom_range=0.,
        # set range for random channel shifts
        channel_shift_range=0.,
        # set mode for filling points outside the input boundaries
        fill_mode='nearest',
        # value used for fill_mode = "constant"
        cval=0.,
        # randomly flip images
        horizontal_flip=True,
        # randomly flip images
        vertical_flip=False,
        # set rescaling factor (applied before any other transformation)
        rescale=None,
        # set function that will be applied on each input
        preprocessing_function=None,
        # image data format, either "channels_first" or "channels_last"
        data_format=None,
        # fraction of images reserved for validation (strictly between 0 and 1)
        validation_split=0.0)


    datagen.fit(x_train)

    # Fit the model on the batches generated by datagen.flow().
    model.fit_generator(datagen.flow(x_train, y_train, batch_size=batch_size),
                        validation_data=(x_test, y_test),
                        epochs=epochs,
                        verbose=1,
                        workers=4,
                        callbacks=callbacks)

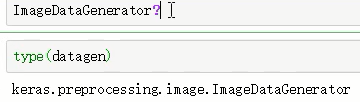
附:python的生成器与keras.preprocessing.image文件的ImageDataGenerator类的关系:
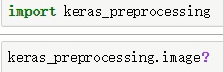
问号可以找在哪个路径:

如下图打开image.py发现是继承image:


找image:
4.模型评估
4.1加载训练好的模型
from keras.models import load_model
from keras.optimizers import Adam

model_filePath = '../resources/saved_models/cifar10_ResNet56v2_model.162.h5'
model = load_model(model_filePath)
model.compile(loss='categorical_crossentropy',
              optimizer=Adam(lr=0.001),
              metrics=['accuracy'])
4.2计算训练集的准确率
scores = model.evaluate(train_X, train_Y, verbose=1, batch_size=1000)
print('Test loss:%.6f' %scores[0])
print('Test accuracy:%.6f' %scores[1])

4.3计算测试集的准确率
scores = model.evaluate(test_X, test_Y, verbose=1, batch_size=1000)
print('Test loss:%.6f' %scores[0])
print('Test accuracy:%.6f' %scores[1])

5.模型测试结果可视化
5.1随机选100张图可视化
import math
import matplotlib.pyplot as plt
import numpy as np
%matplotlib inline
import matplotlib
matplotlib.rcParams['font.sans-serif'] = ['SimHei']
import random

def draw_image(position, image, title, isTrue):
    plt.subplot(*position)
    plt.imshow(image)
    plt.axis('off')
    if not isTrue:
        plt.title(title, color='red')
    else:
        plt.title(title)

def batch_draw_images(model, batch_size, test_imageData, test_X, test_y, id2name_dict):
    index_list = list(range(len(test_imageData)))
    selected_index_list = random.sample(index_list, batch_size)
    true_imageData = test_imageData[selected_index_list]
    true_X = test_X[selected_index_list]
    true_y = np.array(test_y)[selected_index_list]
    predict_Y = model.predict(true_X)
    predict_y = np.argmax(predict_Y, axis=1)
    row_number = math.ceil(batch_size ** 0.5)
    column_number = row_number
    plt.figure(figsize=(row_number+8, column_number+8))
    for i in range(row_number):
        for j in range(column_number):
            index = i * column_number + j
            if index < batch_size:
                position = (row_number, column_number, index+1)
                image = true_imageData[index]
                actual_classId = true_y[index]
                predict_classId = predict_y[index]
                isTrue = actual_classId==predict_classId
                actual_className = id2name_dict[actual_classId]
                predict_className = id2name_dict[predict_classId]
                title = 'actual:%s\npredict:%s' %(actual_className, predict_className)
                draw_image(position, image, title, isTrue)

batch_size = 100 #展示100张图
className_list = ['飞机', '汽车', '鸟', '猫', '鹿', '狗', '青蛙', '马', '船', '卡车']
id2name_dict = {a:b for a, b in enumerate(className_list)}
batch_draw_images(model, batch_size, test_imageData, test_X, test_y, id2name_dict)
plt.show()
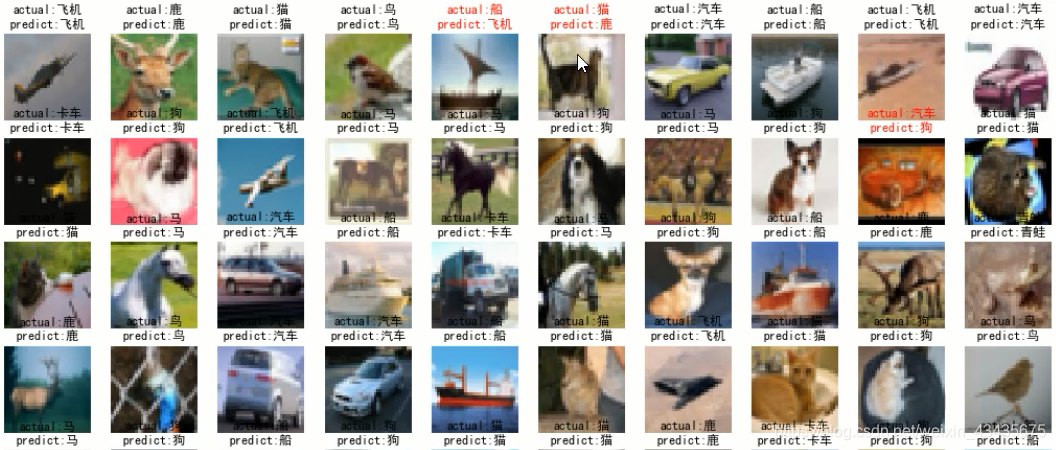
5.2随机选取100张图片的同时,要求10个类别,每个类别取10张
def get_selectedIndexList(test_y, batch_size):
    assert batch_size % 10 == 0, 'batch_size must be times by 10, or you change function get_selectedIndexList'
    column_number = int(batch_size / 10)
    classId_ndarray = np.unique(test_y)
    selected_index_list = []
    for i, classId in enumerate(classId_ndarray):
        index_ndarray = np.where(test_y==classId)[0]
        selected_index_ndarray = np.random.choice(index_ndarray, column_number)
        selected_index_list.extend(selected_index_ndarray.tolist())
    return selected_index_list

def batch_draw_images_2(model, selected_index_list, test_imageData, test_X, test_y, id2name_dict):
    true_imageData = test_imageData[selected_index_list]
    true_X = test_X[selected_index_list]
    true_y = np.array(test_y)[selected_index_list]
    predict_Y = model.predict(true_X)
    predict_y = np.argmax(predict_Y, axis=1)
    row_number = math.ceil(batch_size ** 0.5)
    column_number = row_number
    plt.figure(figsize=(row_number+8, column_number+8))
    for i in range(row_number):
        for j in range(column_number):
            index = i * column_number + j
            if index < batch_size:
                position = (row_number, column_number, index+1)
                image = true_imageData[index]
                actual_classId = true_y[index]
                predict_classId = predict_y[index]
                isTrue = actual_classId==predict_classId
                actual_className = id2name_dict[actual_classId]
                predict_className = id2name_dict[predict_classId]
                title = 'actual:%s\npredict:%s' %(actual_className, predict_className)
                draw_image(position, image, title, isTrue)

batch_size = 100
className_list = ['飞机', '汽车', '鸟', '猫', '鹿', '狗', '青蛙', '马', '船', '卡车']
id2name_dict = {a:b for a, b in enumerate(className_list)}
selected_index_list = get_selectedIndexList(test_y, batch_size)
batch_draw_images_2(model, selected_index_list, test_imageData, test_X, test_y, id2name_dict)
plt.show()
6.Keras中权重文件的读写
6.1使用load_model方法加载模型文件
from keras.models import load_model
from keras.optimizers import Adam

model_filePath = '../resources/saved_models/cifar10_ResNet56v2_model.162.h5'
model = load_model(model_filePath)
model.compile(loss='categorical_crossentropy',
              optimizer=Adam(lr=0.001),
              metrics=['accuracy'])
6.2使用save_weights方法保存权重文件
weights_h5FilePath = '../resources/saved_models/resnet56v2_weights.h5'
model.save_weights(weights_h5FilePath)
6.3 使用load_weights方法加载权重文件
input_shape = (32, 32, 3)
depth = 56
model = resnet_v2(input_shape, depth)
weights_h5FilePath = '../resources/saved_models/resnet56v2_weights.h5'
model.load_weights(weights_h5FilePath)
model.compile(loss='categorical_crossentropy',
              optimizer=Adam(lr=0.001),
              metrics=['accuracy'])
附:xshell的使用:
有VPN可访问:colab.research.google.com
所属网站分类: 技术文章 > 博客
作者:天才也疯狂
链接:https://www.pythonheidong.com/blog/article/8453/376815a0e485b7462108/
来源:python黑洞网
任何形式的转载都请注明出处,如有侵权 一经发现 必将追究其法律责任
昵称:
评论内容:(最多支持255个字符)
---无人问津也好,技不如人也罢,你都要试着安静下来,去做自己该做的事,而不是让内心的烦躁、焦虑,坏掉你本来就不多的热情和定力